

How do you plan on celebrating Cinco de Mayo this weekend? I'm pretty sure that including a piñata is mandatory, so why not make a cactus shaped one? See all the steps after the jump.
Supplies:
- Corrugated cardboard
- Green crepe paper (this piñata used less than three standard rolls of streamers)
- Masking tape
- White glue
- Rope
- Cutting mat
- Exacto knife
- Ruler
- Pencil
- Scissors
- Candy and prizes!

Instructions:
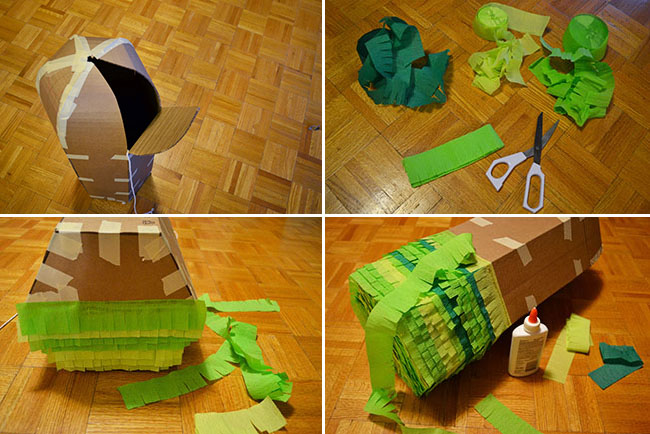
1. Cut out the pieces for the body of the cactus. You can make it whatever size you like - the hexagon base pictured has 6" sides and the six panels are 20" rectangles with an additional 8" curved triangle on top. Be sure to cut the panels with the grain of the corrugated cardboard going horizontally.
2. On each panel, score the line where the rectangle and triangle meet.
3. Curl the triangles, using the edge of a table to help do this smoothly.
4. Use masking tape to attach the panels to the base.
5. Secure the sides together, leaving the top open for now.
6. Thread the rope through a crack in the base and tie several knots. Tape the knot flat to the bottom of the base (fringe will hide this later) and use more tape to secure the rope along the inside of the piñata. Cut the rope, leaving enough excess to allow for hanging later.
7. Tape all but one of the top triangles together.
8. Fold lengths of crepe paper/streamers and cut into fringe.
9. Glue rows of fringe on the base, trimming any excess off the sides.
10. Continue to fringe around the body of the cactus. Once to reach a place where you'd like the arms to go, stop!

11. Time to make your cactus arms! I made two different arms, but you can make yours the same if you wish. Both the arms pictured are 3" wide. Sketch out the front/back pieces onto cardboard first. Once you're happy with the shapes, cut 3" cardboard strips (the the same shaped curved triangle on top) for the sides.
12. Similar to the body of the cactus, for the front/back pieces, score the line where the triangle meets the arm and curl it. Curl the entire length of the side panels.
13. Tape all the panels together.

14. If you choose to attach your arms onto an edge, cut a triangle out of the arm so that it will fit on snugly.
15. Tape the arms onto the body of the cactus. I went too far up with the fringe, so had to trim it away when securing the left arm pictured. Avoid this if possible - taping directly onto the cardboard is much stronger.
16. Continue gluing on fringe until you reach the point where the body of the cactus starts to curve.
17. Fill your piñata with your candy and goodies and use masking tape to secure the rope to the inside of one of the triangle panels. Tape the piñata closed. Depending on how heavy your treats made the piñata, it might be wise to fold the excess rope back and secure the end to the cardboard as well, forming a loop from the rope.

18. Finish gluing crepe paper onto the cactus until totally covered. There you have it - a festive addition to your Cinco de Mayo celebration. Depending on the look you're going for, wouldn't it be fun to add a red flower blooming from the top of one of the arms?

what!! that is so cute! nice tutorial, love that stripey cactus pinata!
ReplyDeleteThanks Lyndsay!
DeleteCutest pinata ever!!! xoxo
ReplyDeleteHello from Alt!
ReplyDeleteSo dang cute!!!!
Thanks Christine! I'm so sad that Alt is over :(
DeleteThis comment has been removed by the author.
ReplyDeleteI'm the Editor of Fun Family Crafts and wanted to let you know that we have featured your project! You can see it here:
ReplyDeletehttp://funfamilycrafts.com/cactus-pinata/
If you have other kid-friendly craft tutorials, we'd love for you to submit them. If you would like to display a featured button on your site, you can get one from the right side bar of your post above. Thanks for a cool project idea!
Pinatas will give us a lot of fun in our parties.
ReplyDeleteYou have done a great job and your post is awesome.
I am very happy to see your post, i bought a pinata for my kids event from http://www.pinatas.com
I definitely try it by my own for our next event.
Thank You,
Victoria Clark
Your Content is great, i love the way you explained.
ReplyDeleteThe political time coming soon, here we can blast our party with Donald Trump Pinata Theme.
Go here to check for your customized Donald Trump Pinata
http://www.pinatas.com/collections/celebrity-pinatas/products/large-custom-donald-trump-pinata
Thank You,
Victoria Clark.